Spark plug replacement for Pontiac Vibe, Toyota Matrix, Toyota Corolla, Toyota Celica
Applicable Vehicles (1ZZ-FE engine)
2003 - 2008 Pontiac Vibe (base)
2003 - 2008 Toyota Matrix (standard and XR)
2003 - 2008 Toyota Corolla (CE,S, LE)
2000-2005 Toyotal Celica (GT only)
Materials
4 spark plugs (Denso 3324 iridium spark plugs. Double check your owner's manual.)
This vehicle comes with Denso iridium spark plugs from the factory. After removing them after 120k miles, I highly suggest using with the original equiment plugs. As of 2020 these cost about $9 each.
Tools
10 mm socket
5/8 spark plug socket
Extension bar for ratchet
Socket wrench
Flat-head screwdriver
Air compressor air gun (optional)
Torque Wrench (optional, not shown)
 |
| Tools for the job |
Time
This procedure takes about an hour to ninty minutes to complete.
Procedure
- Remove engine cover. There are two 10 mm acorn nuts in the center of the cover. The plastic clips at the rear of the cover can be wiggled out with a screwdriver.
 |
| Engine Cover Remove 10 mm acorn nuts (yellow arrow) Remove plastic clips (green arrow) |
2. Inspect under the top of the engine. The center of my engine was full of acorns courtesy of mice. Use compressed air to clean out before proceeding.
 |
| Engine with cover removed |
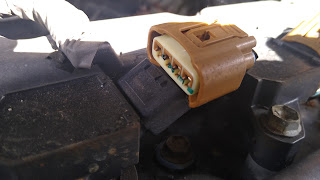
3. The next step is to disconnect the wire clips from the ignition coil pack on each spark plug. See pics below to see what we're accomplishing. Push the tab to remove.
 |
| Plastic wire clip connecting to ignition coil pack - connected |
 |
| Plastic wire clip connecting to ignition coil pack - disconnected |
3a. Disconnect the wire clip on the furthest left coil pack.
 |
| Further right coil pack disconnected |
 |
| Remove 10 mm bolt on right side holding wire harness |
Note: The nut stuck to the bolt and I unscrewed the entire bolt! This could happen. Nothing is broken. Just screw it back in when done.
 |
| Ooops!The entire bolt came out of engine. That's okay. Just screw it back in later. |
3d. Remove the left 10 mm nut as shown with the yellow arrow. You already removed the one with the green arrow. Prop the wiring harness out of the way so you can remove the middle two coil pack clips.
 |
| Wire harness out of the way and coil pack clips removed. |
 |
| Remove all four 10 mm bolts. Two are highlighted here. |
5. Remove the coil packs. Each should just lift out. Be careful to not drop anything down the spark plug holes!
 |
| One ignition coil pack removed |
 |
| All ignition coil packs removed. |
 |
| Removing a plug. MAKE SURE YOU LOOSEN AND NOT TIGHTEN! |
 |
| Spark plug coming out of the engine |
 |
| Look at that beautiful new plug! |
9. Remove the socket wrench. Screw the spark plug into place using just your hands and the extension bar. You are doing this so you do not cross-thread it.
 |
| Screw the spark plug into place by hand. Notice that there is no socket wrench! |
10. Using the socket wrench, tighten so the spark plug washer seats. This is an aluminum engine head, so do not over-tighten. I use my pinky to get it as tight as I can. Then I go an additional quarter turn. If this is your first time, you may opt for a torque wrench. You'll need to research the proper torque spec. I could not find a reliable value on the Internet. Note: Using anti-seize compound could make your spark plug easier to over-tighten with a torque wrench.
 |
| Wire harness in place and ready to be bolted down |
14. Reinstall the four coil pack wires which we removed in step 3.
 |
| Everything is ready to go! |
No comments:
Post a Comment